SpecheBox Help
Quick Links
-
Java 1.7 or later is required to use this
version of the SpecheBox. We recommended usage of the current
Oracle Java Plug-in to maintain ongoing browser compatibility.
-
Your browser must support Java and running Java applets.
-
Your login must have permission on your computer / network / firewall / proxy
server to download Java applets and to make an outbound connection to
text.speche.com:80.
-
Your computer / network / firewall / proxy server must allow persistent HTTP
connections.
-
Browser Settings:
-
Internet Explorer (See General FAQ #6,
General FAQ #7,
General FAQ #8)
-
Your Security Level can be set to Low, Medium-Low, or Medium.
-
If your Security Level is set to Custom, the following security settings must
be not be disabled.
-
Active Scripting - This must be set to Enable or Prompt.
-
Scripting of Java applets - This must be set to Enable or Prompt.
-
Java permissions (under Microsoft VM) - This must not be set to Disable
Java. If your Java permissions is set to Custom, please see
Custom Java permissions settings for the Microsoft VM. Please note
that the settings for the Microsoft VM will be applied to the JRE / JVM that is
currently being used by your web browser (Java Plug-in, etc...).
-
In some versions of Internet Explorer, it may be necessary to modify these
security settings.
-
Download signed ActiveX controls - This must not be disabled.
-
Script ActiveX controls marked safe for scripting - This must not be disabled.
-
All other web browsers (See General
FAQ #5, General FAQ #6,
General FAQ #8,
General FAQ #9, General FAQ
#11)
-
Java must be enabled.
-
JavaScript must be enabled
-
Cookies:
-
A cookie is used to save your display preferences (font and color selections).
-
Cookies must be enabled to allow your preferences to be saved.
-
Firewalls:
-
All communication is via HTTP over port 80.
-
This platform is configured to work with all Standards Compliant firewalls and
proxy servers.
-
If you believe that you are experiencing a connection problem or are notified
of a connection failure, please see Connection Troubleshooting.
The SpecheBox is a signed Java applet published by Speche's parent company
Courtroom Connect. Our certificate is verified by ThawteTM.
You must choose Run to use the SpecheBox. Your authorization is required
to connect to our broadcast server, communicate with proxy servers, and to
interact with your operating system (To COM and To File).
You will receive this pop-up every time you use the SpecheBox if you uncheck
the "Always trust content from this publisher." checkbox. See
Remove Certificate for instructions to remove our certificate.
If you choose Cancel, the SpecheBox will not function. You will need to
close all browser windows and then reload the SpecheBox to receive this
request again.

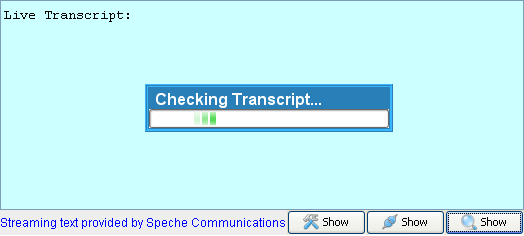
- Upon start-up, the SpecheBox will query our servers about your requested event. When not loading a demo, the Checking Transcript... message will be offered while the SpecheBox negotiates the following connections:
- A connection will be made to one of our broadcast servers, requesting the data stream for your event. The live feed is received over this persistent connection.
- A connection will be made to our transcript server, requesting a snapshot of your event transcript. The transcript snapshot is downloaded over this brief connection.
- A connection will be made to our validation service, to independently validate the status of your event, transcript, and reporter connection. The status information is periodically requested over this connection (polling).
-
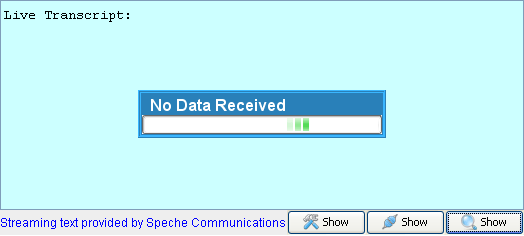
A No Data Received message will be offered if the transcript snapshot is empty, or could not be found. You will also see this message if your event was cancelled, has yet to start, was stopped more than 30 minutes ago, or could not be found on our servers.
-
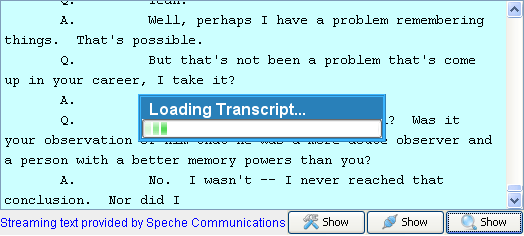
A Loading Transcript... message will be offered while the transcript snapshot is being downloaded and merged with the live data feed. A full transcript snapshit is available throughout every live event and will remain available for 30 minutes, after the broadcast has ended.
SpecheBox Display
This is an example of the SpecheBox real-time display.
Your default colors may be different from those shown on this page.

-
Complete Real-time Transcript Delivery- Regardless of your entry point into the live event, the entire real-time transcript will be delivered to the SpecheBox.
A complete, up to the minute
transcript can also be pushed to a COM / Serial port, saved in a variety of forms, or opened in a separate browser window. See the Transcript Snapshot, the
Save... pull-down, and the Output... pull-down for additional information.
-
Real-time Status Information- The Statusbar offers live status information about the requested event, reporter connection, and data stream. Whether the statusbar is visible or not, the status of the requested event is being validated, independent of the SpecheBox data connection, contributing to the situation specific inline status messages.
-
Transcript Search- The Searchbar allows you to search the transcript and highlight matches. Searching the transcript will pause the display and give you control of the scrollbar. While paused, the SpecheBox will continue to add new transcript content.
-
Customizable Display- Customize the SpecheBox display to fit your needs
or your desktop.
-
Change the Font, Font Size, and Font Style to optimize text readability.
See the Format...
pull-down for additional information.
-
Change the Text and Background Colors to a preferred color palette or to
minimize eye stress. See the Format...
pull-down for additional information.
-
Resize the display area. Lift the SpecheBox off of the web page into a
moveable and resizable window. See Float / Dock
for additional information. If the SpecheBox was loaded into it's
own browser window, resizing the browser window should resize the SpecheBox.
-
Move the SpecheBox anywhere on your desktop. Lift the SpecheBox off of
the web page into a moveable and resizable window. See Float
/ Dock for additional information. If the SpecheBox was
loaded into it's own browser window, you can also move the browser window.
-
Pause the Action- Pause the display when desired, to take control of the scrollbar. See
Pause / Resume for additional information.
-
Redirect the Real-time Data- Send real-time data to a file or COM port.
See the Output... pull-down for additional
information.
-
Save a Snapshot of the Transcript- Save (and open) a complete snapshot
of the transcript in XMPTF, PTF, and HTML format. See the Save...
pull-down for additional information.
-
One-Step Support and Feedback- Report a problem or send us feedback
about the SpecheBox. See Feedback for
additional information.
-
View a Snapshot of the Transcript - View a complete, up to the minute
snapshot of the transcript. See Transcript Snapshot
for additional information.
-
Inline Status Notification- Know that status of your event immediately
after loading the SpecheBox. The event status notification is loaded from
the Speche web server. An event status notification is always shown if
the SpecheBox is loaded and running. An event status notification does
not imply a successful connection to our broadcast server. See
SpecheBox Status Messages for additional information.
-
Live Events- A successful connection to a live event will display one of
the two meassages below, immediatedly followed by the live transcript.
Welcome to [Event Title]
Live Transcript:
-
Upcoming Events- An attempt to connect to an upcoming event will result
in the following notification:
The requested event is scheduled to start on [Start Date] at [Start Time]
-
Cancelled Events- An attempt to connect to a cancelled event will result
in the following notification:
The requested event, scheduled for [Start Date and Time], has been cancelled
-
Archived Events- An attempt to connect to an archived event will result
in the following notification:
The requested event, scheduled for [Start Date and Time], has already ended
-
Inline Status Messages- The SpecheBox will offer
inline status messages, within the content display, to identify different connection and data states. They offer additional
information that is useful for identifying and troubleshooting connection problems. The messages offered are specific to the scenario being encountered by the SpecheBox.
Please Note: Toolbar options are offered at the discretion of the event host.
Some of the options below may not be available for your event.
-
Show Toolbar
- Display the Toolbar
-
Hide Toolbar
- Hide the Toolbar
-
Format... - Change the Font, Size, Style, and Colors
-
Output... - Output the real-time data to a file or COM
port
-
to File
- Output the real-time data to a file
-
to COM port - Output the real-time data to a COM port
-
Save... - Save a snapshot of the transcript to your
computer
-
to XMPTF File
- Save a snapshot of the transcript in XMPTF format
-
to PTF File
- Save a snapshot of the transcript in PTF format
-
to HTML File - Save a snapshot of the transcript in HTML
format
-
Pause / Resume
- Pause or Resume automatic scrolling in the SpecheBox transcript display.
-
Float / Dock
- Float the SpecheBox off the web page into it's own resizable window or Dock
it back onto to the web page.
-
Help
- Open this help file in a browser window
-
Feedback
- Send us feedback or report a problem
-
Transcript - View a snapshot of the complete transcript
-
Show Toolbar Button
Click on the Show Toolbar button to display the Toolbar.

-
Hide Toolbar Button
Click on the Hide Toolbar button to hide the Toolbar.

-
Format... Pull-down
-
Font, Size, and Style
- Change the Font, Font Size, or Font Style
-
Text Color
- Change the Text Color
-
Background Color
- Change the Background Color
-
Reset
- Reset all Format options to default values
-
Click on the Format... pull-down to customize the SpecheBox text formatting.

-
Change Font, Size, and Style
-
Click on Change Font, Size, and Style in the Format... pull-down to open the
Font Chooser. Within the Font Chooser, you can change the font, font
size, or font style.

-
Select your desired Font, Font Size, or Font Style and click OK.

-
The text will be reformatted to your selected Font, Font Size, and Font Style**.

-
Change Text Color
-
Click on Change Text Color in the Format... pull-down to display the Text Color
selector.

-
Select your desired Text Color and click OK.

-
Your selected Text Color will be applied to the SpecheBox**.

-
Change Background Color
-
Click on Change Background Color in the Format... pull-down to display the
Background Color selector.

-
Select your desired Background Color and click OK.

-
Your selected Background Color will be applied to the SpecheBox**.

-
Reset to Default Formatting
-
Click on Reset to Default Formatting in the Format... pull-down to change the
Font, Font Size, Font Style, and the Text and Background Colors to the default
values assigned by the displaying web page.

-
The default values will be applied to the SpecheBox**.

**Your Font and Color selections will be
preserved in a cookie if your privacy settings and the displaying web page
allow it.
-
Output... Pull-down
-
to File
- Output the real-time data to a file
-
to COM port - Output the real-time data to a COM port
-
Click on the Ouput... pull-down to direct the
unmodified real-time data feed from the court reporter to a file or COM port on
your computer. The transcript data will streamed at high speed, from the
beginning, until it has caught up to the live feed. Depending on your
point of entry and available bandwidth, downloading the transcript may take a
few moments or several minutes. When reconnecting to an event (with the
same computer), the transcript will pick up where you left off at
disconnection.

-
Direct real-time data to a File
-
Click on Direct real-time data to a File in the Output... pull-down to direct
the real-time data feed a file. Any software capable of receiving a data
feed from a shared file will be able to use this feature live. Any
software capable of reading and parsing the real-time data (CaseView, Bridge,
ASCII,...) can use this fils as an archive.

-
Choose the save location, enter the file name, and then click OK. Choose
any file extension that will work with your software. After choosing the
file, the Output... pull-down will be replaced with the To Screen button, and
the SpecheBox will begin writing data to the file.

-
To stop the writing to the file and return to Screen mode, click on the To
Screen button.

-
Direct real-time data to a Serial / COM Port
-
Click on Direct real-time data to a Serial / COM Port in the Output... pull-down
to direct the real-time data feed to COM port. Any software capable of
receiving a data feed from a COM / Serial Port will be able to connect to the
Virtual COM Port.

-
FIRST USAGE ONLY
The
SpecheBox COM Components must be installed on your computer.
After installation, you may need to restart your browser to
allow the SpecheBox to access Serial / COM ports on your computer.
-
The first time you click on Direct real-time data to a Serial / COM Port, you
will be asked to install the SpecheBox COM Components. Click OK to
continue with the installation.

-
Users can follow the progress of the SpecheBox COM Component installation in the COM Loader progress bar.

-
Users with UAC enabled operating systems will encounter the following UAC prompt when installing the SpecheBox COM Components. Click Yes to
continue with the installation.

-
After the installation is complete, you may need to close your browser (all windows)
and reload the SpecheBox display page before you can use this feature.

-
After the COM components have loaded, you will be notified where to connect
your software. If you click OK before connecting, this message will
reappear if you have not connected within 30 seconds. After you have
connect your software, the Save... pull-down will change to the To Screen button
and the SpecheBox will begin to relay data from the beginning of the event, or
wherever you left off earlier. Click Cancel will return the SpecheBox to
screen mode.

-
To stop feeding the serial / COM port and return to Screen mode, click on the
To Screen button.

-
You will receive this notice if you disconnect your software from the
designated COM port during data relay. If you click OK before
reconnecting, this message will reappear if you have not reconnected within 30
seconds. Click Cancel will return the SpecheBox to screen mode.

-
You will receive this reminder if you click on the To Screen button during data
relay. Failure to disconnect between SpecheBox session may result in the
creation of additional Virtual COM Ports.

-
Save... Pull-down
-
to XMPTF File
- Save a snapshot of the transcript in XMPTF format
-
to PTF File
- Save a snapshot of the transcript in PTF format
-
to HTML File - Save a snapshot of the transcript in HTML
format
-
Click on the Save... pull-down to save a snapshot of the transcript to your
computer in XMPTF, PTF, or HTML format.

-
Save to XMPTF
-
Click on TextMap™ XMPTF Transcript Snapshot to save a snapshot of the in XMPTF
format.

-
Choose the save location, enter the file name, and then click OK.

-
After the transcript snapshot has been saved, you will have the option to open
the XMPTF file. The file will be opened by the application associated
with the .XMPTF extension on your computer. You will asked to select an
application if the .XMPTF extension is not registered on your computer.

-
Save to PTF
-
Click on LiveNote™ PTF Transcript Snapshot to save a snapshot of the in PTF
format.

-
Choose the save location, enter the file name, and then click OK.

-
After the transcript snapshot has been saved, you will have the option to open
the PTF file. The file will be opened by the application associated with
the .PTF extension on your computer. You will asked to select an
application if the .PTF extension is not registered on your computer.

-
Save to HTML
-
Click on HTML Transcript Snapshot to save a snapshot of the in HTML format.

-
Choose the save location, enter the file name, and then click OK.

-
After the transcript snapshot has been saved, you will have the option to open
the HTML file. The file will be opened by your default browser.

-
Pause
 / Resume
-
By default, the SpecheBox will automatically scroll to display new text as it
is received. Clicking on the Pause icon will pause the automatic
scrolling. Text will continue to be added to the transcript and the
scrollbar can be manually controlled. Afte clicking on the Pause icon,
it will change to the Resume icon.

-
Click on the Resume icon to resume automatic scrolling.

-
Float
 / Dock
-
Clicking on the Float icon will lift the SpecheBox off of the web page into a
movable and resizable window. When resizing, the SpecheBox will
automatically adjust to the size of the window. After clicking on the
Float icon, it will change to the Dock icon.

-
The SpecheBox location on the web page will look like this.

-
Click on the Dock icon (or close the floating window) to return the SpecheBox
to the web page.

-
Help

Clicking on the Help icon will open this document in a new browser
window.

-
Feedback

-
Click on the Feedback icon to send us feedback or report a problem.
Some networks may prevent us from receiving your feedback. If you
encounter any problems sending us feedback, call Speche Support at (877)
838-9067 or e-mail us at support@speche.com.

-
Enter your e-mail address if you would like a response or are reporting a
problem. Enter your feedback or a description of your problem and click
on the Send button. Your feedback will include information about your
current session to assist us with problem resolution.

-
Transcript Snapshot
 / View Transcript Button
Clicking on the Transcript Snapshot icon will open a complete, up to the minute,
transcript in a new browser window.

Clicking on the View Transcript button will open a complete, up to the minute,
transcript in a new browser window.

Please Note: Statusbar options are offered at the discretion of the event host.
The Statusbar may not be available for your event.
-
Show Statusbar Button
Click on the Show Statusbar button to display the Statusbar.

-
Hide Statusbar Button
Click on the Hide Statusbar button to hide the Statusbar.

-
Expand Event Status Button

Click on the Expand Event Status button to display the event status messages.

-
Collapse Event Status Button

Click on the Collapse Event Status button to hide the event status messages.

-
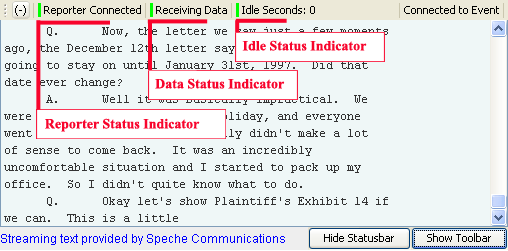
Event Status Display
View the status indicators for for your event.
Event Status Collapsed
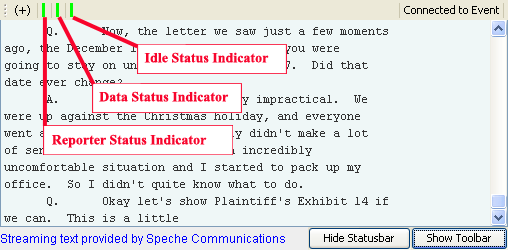
Event Status Expanded
-
Reporter Status
View the reporter connection status for your event.

- Color:
The indicator will be gray while connecting to our servers, and will remain gray if no live event could be found to match your request.
Messages:
- Connecting...
This message is displayed while the SpecheBox loads and establishes a connection.
- No Event Found
This message is displayed if the requested event is not live. Verify the date and time of your event. Verify your access method (link) with the event host.
- Color:
A green indicator means that your event has a reporter connection.
Message: Reporter Connected
- Color:
A red indicator means that your event does not have a reporter connection.
Message: No Reporter Connected
-
Data Status
View the data status for your event.

- Color:
The indicator will be gray while connecting to our servers, and will remain gray if no live event could be found to match your request.
Messages:
- Connecting...
This message is displayed while the SpecheBox loads and establishes a connection.
- No Event Found
This message is displayed if the requested event is not live. Verify the date and time of your event. Verify your access method (link) with the event host.
- Color:
A green indicator means thats your event has received data within the last 15 minutes.
Messages:
- Receiving Data
This message is displayed if your event has received data within the last 10 seconds.
- Data Received
This message is displayed if your event has received data within the last 15 minutes.
- Color:
A yellow indicator means that your event has received data, but not within the last 15 minutes. View a Transcript Snapshot, if available, to determine if your event is on break or has ended.
Message: Data Received
- Color:
A red indicator means that your event has not received any data.
Message: No Data Received
-
Idle Status
View the connection idle status for your event. The idle status indicates how much time has elapsed since reporter data was last received.

- Color:
The indicator will be gray while connecting to our servers, and will remain gray if no live event could be found to match your request.
Messages:
- Connecting...
This message is displayed while the SpecheBox loads and establishes a connection.
- No Event Found
This message is displayed if the requested event is not live. Verify the date and time of your event. Verify your access method (link) with the event host.
- Color:
A green indicator means that reporter data has been received within the last minute.
Message: Idle Seconds: X
X represents the number of the seconds without data.
- Color:
A yellow indicator means that reporter data has been received within the last 5 minutes.
Message: Idle Minutes: Y
Y represents the number of the minutes without data.
- Color:
A red indicator means that no reporter data has been received within the last 5 minutes.
Message: Idle Minutes: Y
Y represents the number of the minutes without data.
-
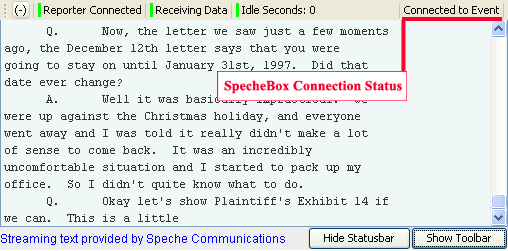
Connection Status
The status of the SpecheBox server connection.
Messages:
- Loading... This status is displayed while the SpecheBox is loading.
- Connecting to text.speche.com:80 This status is displayed while the SpecheBox is connecting.
- Connected to Event This status is displayed upon connecting to your requested event and receiving an HTTP 200 response.
- Event Not Found This status is displayed upon receipt of an HTTP 400 response. Additional information is provided if a status conflict is detected.
- Connection Failure This status is displayed upon receipt of an unexpected HTTP response or the occurrence of a connection error. The Speche servers only issue HTTP 200 or HTTP 400 responses. Any other HTTP response is coming from your network (proxy server, firewall, or security device), or an intermediary network, such as your internet provider.
- End Of Stream Detected. Connection Closing. This status is displayed if the data stream is closed. Viewing this status may indicate that your network does not allow data streams or is enforcing a time limit.
- Disconnected This status is displayed after 10 failed attempts to connection your requested event. Additional information is provided for connection failures or if a status conflict is detected.
-
Re-Connect Button
Click on the Re-Connect button to restart the SpecheBox connection process. The Re-Connect button is only shown after the SpecheBox has experienced 10 connection failures and disconnected.

-
Troubleshooting... Button
Click on the Troubleshooting... button to open the SpecheBox Connection Troubleshooting Assistant. This web page provides viewers and their technical support staff with the information needed to resolve connection failures or frequequent reconnections.

Please Note: Searchbar options are offered at the discretion of the event host.
The Searchbar may not be available for your event.
-
Show Searchbar
- Display the Searchbar
-
Hide Searchbar
- Hide the Searchbar
-
Find Text - Enter the text to search for.
-
Prev Button - Search for the prevous occurrence of the text. A new search will start from the bottom of the transcript.
-
Next Button - Search for the next occurrence of the text. A new search will start from the top of the transcript.
-
Match Case Checkbox - Check the Match Case checkbox to perform a case-sensitive search.
-
Search Status - Displays the status of your search.
-
Resume Icon - Click on the Resume Icon to resume automatic scrolling.
-
Show Searchbar Button
Click on the Show Searchbar button to display the Searchbar.

-
Hide Searchbar Button
Click on the Hide Searchbar button to hide the Searchbar.

-
Find Text
Type the search text in the Find textbox. To begin searching, click on the Prev or Next buttons, or press the Enter key (see Next Button). Changing the search text will reset the search status and clear all highlights.

-
Prev Button
Click on the Prev button to find the previous occurrence of the serch text, or to start a search from the bottom of the transcript. Clicking on the Prev button will pause the display, giving you control of the scrollbar (see Resume Icon). All existing occurrences of the search text will be highlighted. Continuing to click on the Prev button will traverse all occurrences of the seach text, from the bottom to the top (repeating).

-
Next Button
Click on the Next button to find the next occurrence of the serch text, or to start a search from the top of the transcript. Clicking on the Next button will pause the display, giving you control of the scrollbar (see Resume Icon) All existing occurrences of the search text will be highlighted. Continuing to click on the Next button will traverse all occurrences of the seach text, from the top to the bottom (repeating).

-
Match Case Checkbox
Check the Match Case checkbox to perform a case-sensitive search. Checking or unchecking the Match Case Checkbox will reset the search status and clear all highlights.

-
Search Status
The Search Status can be NEW SEARCH, NOT FOUND, or FOUND #, where # is the current number of occurrence in the transcript. Please Note: As you traverse transcript using Prev or Next (Enter), the number of occurrances found in the transcript may increase as new data is received.

-
Resume Icon
Click on the Resume icon in the Searchbar (or Toolbar) to resume automatic scrolling of the transcript display.

Contact Speche
If you can't find a solution in this troubleshooting section, please check the
eScription FAQ or contact Speche Support.
Load Failure
-
Please try the Speche Test Page
to determine why, or to send us a Problem Report.
-
Java is required to run the SpecheBox. Speche recommends the
Oracle Java Plug-in.
-
Security software may be preventing you from downloading the SpecheBox applet.
Temporarily disable your security software and attempt to access the
SpecheBox. If this works, consult the help files for your security
software or contact your vendor to learn how to add Speche.com (or any other
SpecheBox provider) to your software's allow or exempt list.
-
Network users should contact your technical / network support staff with a
description of what you are doing and the problems that you are encountering.
Include a link to this web page, http://www.speche.com/helpCOM.htm.
If using e-mail, please copy support@speche.com.
Start-up Failure
-
If you did not receive the Speche Authorization Request,
minimize all windows to see if it landed behind another window. If you
did not receive SpecheBox Authorization Request, please close all browser
windows and try to load the SpecheBox again. If still do not receive the
SpecheBox Authorization Request, try both of the following steps to help us
diagnose the problem.
-
Try the Speche Test Page
to determine if a browser setting is causing a problem, or to send us a Problem
Report.
-
Send us Feedback. Errors and other information
specific to your current SpecheBox session will be sent with your comments.
No Text?
-
The live display only shows the text received since the SpecheBox was opened.
Please verify that the proceeding is currently underway through a
separate video link or the Transcript Snapshot, if offered.
-
Look at the Text Color and Background Color in the Format...
pull-down. If you cannot differentiate the Text and Background colors,
change one of them to create contrast.
-
See Connection Troubleshooting below.
-
Try the Speche Test Page
to determine if a browser setting is causing the problem, or to send us a
Problem Report. Our support team will help you or your technical staff in
the diagnosis of any connection problem.
-
Send us Feedback. Errors and other
information specific to your current SpecheBox session will be sent with your
comments.
-
Security software may be preventing the SpecheBox from connecting to our
broadcast server. Temporarily disable your security software and access
the SpecheBox. If this works, consult the help files for your security
software or contact your vendor to learn how to add Speche.com to your
software's allow or exempt list.
-
Network users should send us a Problem Report and send us Feedback (include
your e-mail address). Speche Support will contact you with
recommendations. If you are being informed that a firewall or proxy
server may be blocking your connection, please contact your technical / network
support staff with a description of what you are doing, the problem that you
are encountering, and the information below (or a link to this web page,
http://www.speche.com/helpCOM.htm). If using e-mail, please copy
support@speche.com.
The SpecheBox is a signed applet that connects to text.speche.com:80 when
initialized, using HTTP 1.0 or 1.1. The SpecheBox is proxy aware and will
utilize a proxy when detected. It will honor authenticating proxies as
well as the proxy exception list. For encrypted connections, the
SpecheBox generates a 1024 bit RSA keypair and inserts its public key into the
request header. The request is in the form of a METHOD POST to
/livestream.aspx asking for a persistent HTTP connection. The response is
a stream of MIME type application/octet-stream (encrypted for encrypted
connections...). Once the applet is connected, the server will send a
"pulse" every 3 seconds during periods of inactivity in order to keep the
connection from timing out due to inactivity. If a connection is lost,
the SpecheBox will try to reconnect perpetually or until the server tells it
the event it is trying to connect to does not exist.
-
If you were notified that installation of the COM components failed, please
send us Feedback
from your current session.
-
If the SpecheBox becomes unresponsive for a prolonged period following COM
component, close all browser windows and access the SpecheBox again. Some
security configurations may prevent access to the RXTXcomm package or the
Virtual Serial Driver (by the JVM) immediately after installation.
-
Send us Feedback. Errors and the current
state of COM components will be sent with your comments.
-
Older versions of some applications may need to be started after the SpecheBox
has created the virtual COM ports, or before opening the SpecheBox.
-
The COM components can be uninstalled and removed with our
COM Cleaner page.
-
VistaTM and Windows 7TM users running the UAC are restricted to low and medium integrity folders. If you encounter problems, try saving files to either the My Documents or the Shared Documents folders.
-
Send us Feedback. Errors and information about
the current session will be sent with your comments.
-
Open Control Panel. If you are in Category View, click on Other Control Panel
Options on the left menu under "See Also".
-
Click on Java to open the Java Control Panel.
-
Click on the Security tab of the Java Control Panel.
-
Click on the Certificates... button on the Security tab to open the
Certificates window.
-
In the Certificate window:
-
Set the Certificate type to Trusted Certificates
-
Click on the User Tab
-
Find Courtroom Connect under the Issued To column and click on that row.
-
Click the Remove button
-
Click OK on the confirmation pop-up
-
Click on the Close button to close the Certificates window
-
Click OK to close the Java Control Panel (clicking Cancel will NOT restore the
certificate)


 / Resume


 / Dock


 / View Transcript Button


